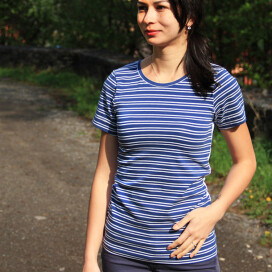
The pattern for women’s T-shirt/sweatshirt TO THE CITY
- This pattern for women’s T-shirt/sweatshirt was constructed in a professional program for clothing pattern development and it is available in sizes 48 – 60 (find size chart below).
- 2in1 pattern:
- Two length variants: classic & crop top
- Two sleeve styles: wide & classic semi-tight
- Every pattern has multiple PDF files (A4 all sizes, A4 individual sizes, A1/A0, sewing guide, etc.) so the files are delivered as a ZIP archive. You can unzip the archive online or download special software to unzip the files (such as WinRAR for Windows or The Unarchiver for Mac). Please use a computer to unzip and print the pattern, there might be issues with printing on mobiles or tablets.
- When printing, be sure to select "Poster" and size "100%" to print the pattern correctly.
Difficulty level:
Sewing instructions:
This article contains sewing instructions for various styles of the T-shirt/Sweatshirt TO THE CITY:
Recommended material:
You can use almost any type of knit. Depending on the thickness of the material (its weight), you will get either a T-shirt or a sweatshirt.
You can buy suitable fabrics here:
Dumlatek.cz:
- Knits
- You can use something like this for a comfortable T-shirt:
- And these materials are a good choice for a sweatshirt:
Other materials:
Hems (bottom, sleeves, and neck opening) are finished with strips of elastic material. T-shirt with contrasting red hems is finished with a ribbed hem knit:
Hem knits
Because sleeves are draped to their hems quite a lot,
it is necessary to choose really elastic material for the hems. Ribbed hem knits are an ideal choice.
The required amount of material:
(for 140 cm / 55” wide fabric)
- Sizes 32 - 36: 0.7 m (28”)
- Sizes 38 - 46: 1.4 m (28”)
- Sizes 48 - 60: 1.5 m (60”)
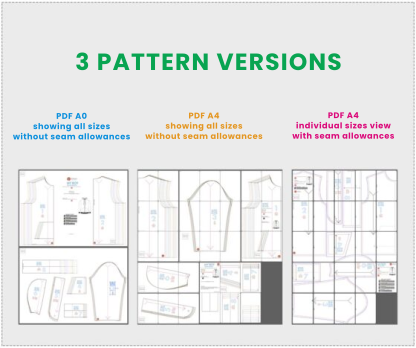
There are three versions of this pattern:
(you will receive all of them after purchase)
- 1st version (one size view) – PDF A4 – pattern in individual sizes with seam allowances outlined– all individual sizes of the pattern (pattern of each size shows sewing lines and seam allowances are outlined too).
- 2nd version (classic view) – PDF A4 pattern showing all sizes without seam allowances - all sizes are outlined “in one picture”(each in its own color) without seam allowances.
- 3rd version (classic view) – A0 pattern showing all sizes without seam allowances. This large-format pattern does not need to be glued together. You can print it on a home or office plotter or in one of the many copy centers.
![]()
You can choose what works best for you. The advantage of the classic view (where all the sizes are shown) is that you can easily customize your pattern to fit body types in between the chart sizes. One size view saves time during preparation - you do not have to think where and how much to add for the seams, because everything is already there.
When and how do I receive my pattern?
After the payment has been credited to the account, I will immediately send the pattern with sewing instructions
in PDF/ZIP format to your e-mail address. Then you just need to print and assemble the pattern of the desired size. Check out my article on
how to assemble a paper pattern from A4 pages.
Size chart:
![]()
You can find more about the size charts (and metric system size charts) here:
Size charts and how to use them correctly
Declaration
Pattern, including instructions and all photographs, is a copyrighted work, and any distribution, copying, or disclosure to third parties is prohibited and will be considered a violation of the Copyright Act (Copyright Act, Act No. 121/2000 Coll. / Zákon o právu autorském – Zákon č. 121/2000 Sb., Česká Republika), which may be prosecuted. Contents of the pattern (and instructions) are based on the personal experiences of the author. Your successes and possible failures are in your hands and the author bears no responsibility for them. But that doesn’t mean you’re on your own. Whenever you need advice, please do not hesitate to contact me at petra@picolly.com
Notice to companies
The pattern is not intended for commercial use. If you are a tailor (for example) and you want to use any of my patterns for commercial purposes, please do not hesitate to contact me. I will be happy to discuss my options with you and create a bespoke offer for you.
For best results, please read the following:
- The patterns are constructed in ready-made sizes because it is not possible to construct a pattern for all body types (the size chart would get too congested).
- To make the clothes fit the individual figure perfectly, you need to carefully measure them first. Then compare measurements with the size chart and paper pattern. That is the only way to find the right pattern size.
- Besides, it’s almost always necessary to adjust the pattern slightly to make it fit perfectly. (Even if we have two women whose measurements are the same, they will differ in other ways – one of them may have a narrower back and a larger bust, the other may be more muscular with a smaller bust. One of them may also have wider hips and flatter buttocks, the other may have narrower hips and rounder buttocks…) Patterns (and their sizes) are only rough guidelines. If you are going for a perfect fit, you need to perform fitting tests and adjust the garments accordingly. Sewing is a creative activity and you need to take into account that each of us is built differently. THIS APPLIES TO CHILDREN’S AND MEN’S CLOTHES TOO – WE ARE ALL UNIQUE.
- If you are using some pattern for the first time, always sew a “test piece” from a cheaper fabric first. Mark any adjustments in the paper pattern and then use it to sew the final product. It is a classic tailoring method. No two fabrics are the same, therefore, please note that what works with one fabric may not work with another. That is why you should always sew test samples. Sewing is not like baking, you can’t just pick the pattern and expect the perfect results without some measuring, testing, and adjusting. That’s just how it works.
- I also recommend temporarily stitching all seams that affect circumferences (such as side seams, instep seams, etc.) before sewing. So, you can try the garment on and adjust it if necessary. Do not underestimate ironing and testing the clothes during the sewing process.
- Also, don’t forget to carefully mark seam allowances. Beginners often forget about them. It is necessary to measure seam allowances with the measuring tape around the entire pattern and then sew along the correct sewing lines – seam allowances width away from the cutting edges. Careless work with the seam allowances can result in large deviations in the overall widths and lengths of the individual pieces.
- When positioning the paper pattern pieces always make sure that the pieces are oriented correctly.
Free patterns:
Not sure whether to buy a pattern? Not sure what the pattern will look like and if you ever be able to put it together? Download one of my patterns for free and see what it looks like and try using it. Free patterns are in the same format as the patterns available in the store. You check them out here:
Worth reading:
If you want to take your sewing skills one step further, I suggest you go through:
You might be interested in:
 You can choose what works best for you. The advantage of the classic view (where all the sizes are shown) is that you can easily customize your pattern to fit body types in between the chart sizes. One size view saves time during preparation - you do not have to think where and how much to add for the seams, because everything is already there.
 You can find more about the size charts (and metric system size charts) here:
Size charts and how to use them correctly


